Contents
Installation
For installation instructions and help, click here.
Opening Files
Open a file by clicking ![]() or or by dragging and dropping an audio file onto the app. File types you can open:
or or by dragging and dropping an audio file onto the app. File types you can open:
- Audio: Most common formats are supported, including MP3, WAV, FLAC, OGG, WavPack, and MusePack, but files with DRM will not work. Other formats may or may not work depending on your operating system. If you get an error trying to open an audio file, convert it to a supported format like WAV and try again.
- MIDI: Can be opened to export sheet music or to use AnthemScore as a basic MIDI editor.
- musicXML: MusicXML sheet music files can be viewed in the internal viewer.
- ASDT: AnthemScore project files
Open File Dialog

Time options
- Full song: Process the entire song. You can choose this if the song is under about 5 minutes or if you have a lot of memory on your computer.
- Section of song: Process only part of the song. Recommended if the song is very long or you have limited RAM.
Processing
- Find notes: Perform note detection
- Instrument detection: Automatically assign notes to instruments
- Percussion detection: Detect percussion, including bass drum, toms, hi-hat, etc.
Accuracy
- Accuracy slider: The accuracy setting on a scale from 1 to 10, where higher is more accurate, but also slower. Setting it to 1 will produce the same results as AnthemScore version 5 and skip instrument and percussion detection. Using 5 is suggested for most users. The highest settings may produce very slim improvements for much longer processing time.
Batch processing: Studio edition users can add additional songs to the file queue while a song is being processed by opening extra files. If you add songs one at a time, the open file dialog will pop up and you can adjust the settings. If you add multiple files at once, they will be transcribed using the default settings and saved to the "Default Save Folder" listed in . To cancel a song, click the red X next to it.
It can take several minutes to process one song. To reduce the wait time, use a lower accuracy setting, process the song in parts (such as 0 to 30 seconds, then 30 to 60, etc.), or use a computer with more processor cores.
Instrument Settings
Click  to open sheet music settings.
Sheet Music Settings
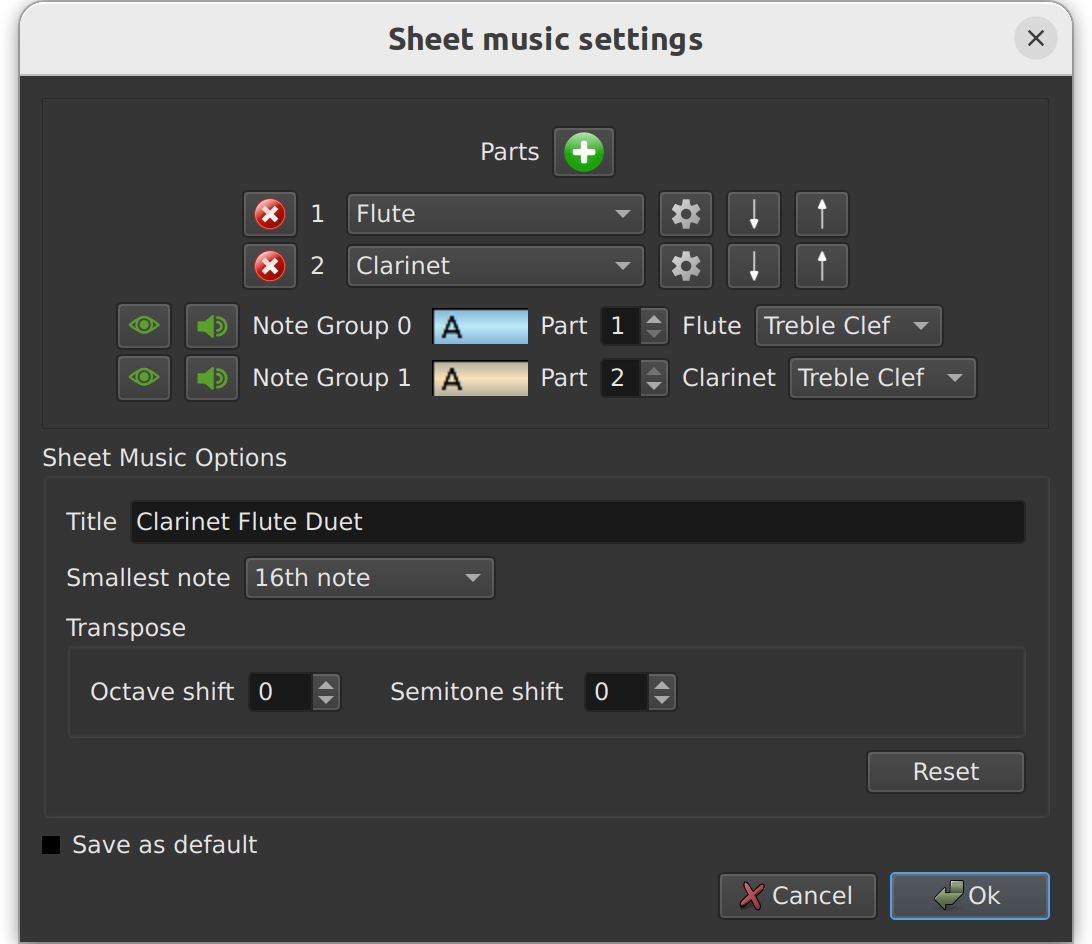
Parts
These are the instrument parts that will show up when you export sheet music or MIDI. Make sure there is one part for every instrument you want in the sheet music. Click ![]() to add a part and
to add a part and ![]() to remove it. Use the arrows to place the parts in the order you would like them to appear in sheet music. Each part has a settings button
to remove it. Use the arrows to place the parts in the order you would like them to appear in sheet music. Each part has a settings button  with additional options like tablature for stringed instruments.
Supported Instruments
AnthemScore has presets for many instruments. To add an instrument not listed, select "custom" from the instrument dropdown and define the lowest and highest notes it can play as well as transposition in the instrument settings. You can also define the number of strings and frets and the string tunings if you want to create tablature.
Note Groups
This is where you notes to instruments. Each note is assigned to a group and each group is assigned to a part. Every note group you are currently using will show up here with the assigned instrument. Usually you want one note group for each part, but for piano you may want one note group for treble clef and another for bass so you can adjust which clef a note is written to.
- Show/hide notes: This allows you to hide the entire note group in the main display area. You may want to do this to help focus on one part at a time. Hidden groups will still show up in sheet music
- Mute/unmute: Muting note groups will prevent them from playing during note playback.
- Part: The instrument part the note group is assigned to.
- Staffs: The staffs of the instrument part the note groups can be written to. Most instruments just have one staff, but some like piano have multiple. If you choose Treble and bass the notes will be auto assigned to one staff based on their pitch.
Sheet Music Options
- Title: The title of the sheet music
- Smallest note: The smallest allowed note in the sheet music
- Transpose: Any optional transposition, applies to all instruments.
- Simplify score: A slider to reduce the number of notes in the exported score, making it easier to play.
Instrument Part Settings

Instrument Name
The instrument name in the sheet music score.
Staffs
The instrument's staff(s) in the sheet music score:
- Treble and bass: The instrument will have both treble and bass clefs. Individual note groups can be written to one or both clefs.
- Treble clef only: The instrument will only have a treble clef.
- Bass clef only: The instrument will only have a bass clef.
- Tablature: The instrument will have a tablature staff. Only certain stringed instruments and the 'custom' instrument have this option. If tablature is selected, the number of Frets and Strings as well as the tuning for each string can be adjusted. Strings should be set to the instrument's written, not sounded, pitches. With guitar and bass guitar, for example, this is an octave above the sounded pitch.
Instrument written transpose
This transposes the written notes if the instrument is in a key other than C, like the B♭ clarinet, or is written in a different octave from how it sounds, like the guitar.
Written Note Range
The written note range lets you set the lowest and highest possible notes the instrument can play (after any transposition). When there is a note outside of this range, it will either be moved within the range by changing the octave or removed from the sheet music, depending on the option you select.
MIDI Instrument Number
The MIDI program used for playback in AnthemScore and when exporting MIDI or musicxml files. Some sheet music notation programs will use this when playing musicxml files.
Playback
Playback Options
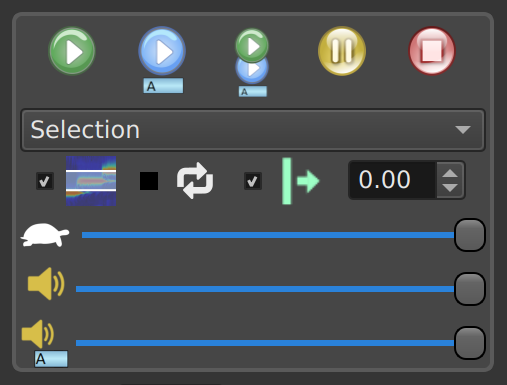
Playback Buttons
- Play music: Play music only.
- Play notes: Play notes only.
- Play music and notes: Play music and notes simultaneously.
- Pause: Pause/resume playback.
- Stop: Stop the playback.
Playback Region
- Here to end: Play from the audio in the current window to the end of the song
- Start to end: Play the whole song
- Selction: Play the region selected by clicking and dragging on the spectrogram or timeline. If no region has been selected, the audio visible in the window will be played.
Options
- Selected frequencies: Only plays audio or notes in the frequency range spanned by the selection. This can be useful for transcribing bass and treble notes separately.
- Loop: Repeat playback forever.
- Show playback line: If checked, shows a green playback line tracking playback. Otherwise, the whole window continuously scrolls.
- Playback line offset: Adjust playback line alignment by shifting the line forward by the given number of seconds, backward if negative.
Sliders
- Playback speed: Slow down playback.
- Song volume: Adjust volume for the song audio.
- Note volume: Adjust volume for the notes.
- Percussion volume: Adjust volume for percussion notes
Click the volume icons to quickly mute or unmute.
Selecting a region
Click and drag with the right mouse button to select a region. You can select along the timeline or in the center spectrogram window. To clear a selection, just right click. The mouse button can be changed in the preferences menu.
Changing the Playback Sound
Playback of notes uses a MIDI sound font, which you can customize. In your AnthemScore installation folder, there is an AS_resources folder with a file called FluidR3Mono_GM.sf3. You can replace this file with any other .sf3 file. Just rename it to that exact name after making a backup copy of the original. Then restart AnthemScore.
Notes

Overview
Notes are blue rectangles labeled with the pitch name spanning from the start to the end of the note in a musical grid. The grid size is adjusted by changing the smallest allowed note in the drop down box in the side panel. Some values may be grayed out based on the time signatures in the song to ensure every beat contains at least one smallest note. Individual beats can also be repositioned (see Editing Measures).
Note Editing
Click the note tab ![]() or press "1" on your keyboard to switch to note editing mode. By default, each note ends where the next note starts. Once you drag the note end point, it will stay fixed at the new point. If you want to reset a note end point to auto-end at the next note, right click on it's starting point twice to remove it and then add it again. Editing single notes:
or press "1" on your keyboard to switch to note editing mode. By default, each note ends where the next note starts. Once you drag the note end point, it will stay fixed at the new point. If you want to reset a note end point to auto-end at the next note, right click on it's starting point twice to remove it and then add it again. Editing single notes:
- Left click in an empty space to add a note there.
- Left click and drag from the start to end to create a note with a specific duration.
- Left click on the start of an existing note (within the the first grid square) to remove it.
- Left click and drag the start of a note to move it to a new location.
- Left click and drag note edges to change the start/stop position (hold "alt" to make this easier)
- Right click on a note to get an info pop-up with more editing options.
Editing many notes:
- Drag the note slider in the side panel to auto add/remove notes using their AI calculated scores. If you select a region first, this will only add/remove notes within that selection.
- Right click and drag to select a group of notes. Hold 'ctrl' and repeat to create multiple regions. To clear a selection, just right click.
- Select large regions by dragging over the timeline or keyboard.
- Click
 (ctrl+c) to copy and
  (ctrl+v) to paste a group of selected notes. Left click in the final location to finish the paste or press escape to cancel.
 - Ctrl+left click and drag a group of selected notes to clone them.
- Delete selected notes with the "delete" key. You may need to set the shortcut key in .
- Use auto-stops on selected notes in the side panel note hamburger menu will make all selected notes stop where the next note starts.
- Remove auto-stops on selected notes in the side panel note hamburger menu will fix all selected note stops in their current positions.
- If there are multiple instruments, you can run to automatically detect instruments and assign notes to new groups. This is more accurate once all the note start positions are correct.
Note Groups
All notes are assigned to a group number from 0 to 14. You can change the note group by selecting one or more notes and changing the note group drop down in the side menu. Note groups can be assigned to instrument parts. Click to change which part each note group is assigned to. For instruments like piano, which have multiple staffs, you can assign note groups to just one staff or to both. If both, then notes will be placed in one or the other depending on their pitch. When exporting MIDI files, note groups are used as track numbers and to determine the MIDI instruments used.
Lock/Unlock Notes
Lock notes to prevent their accidental deletion from the delete key or from the note slider. Locked notes have a thick black border. Locking also sets the note start positions so that they won't shift when the grid size is made smaller. This is useful when most notes should have a larger grid size while a small number of notes are shorter (for example, most are 8th notes, but a couple are 16th notes).
Triplets
Eighth and quarter triplets can be formed by selecting 3 consecutive notes that span a distance of 2 eighth or quarter notes. The triplet button  in the side panel will toggle the triplet for the selected notes. Triplets can be identified by a "1/3", "2/3", or "3/3" on the note.
Learn note threshold from edits
This option is in the note hamburger menu in the side panel. It causes the program to learn which notes you repeatedly add or remove and automatically updates the notes from that point onwards. With this feature enabled, adding or removing 1 note can cause notes with that same pitch to also be added or removed at multiple points later in the song. Changes are only made in the forward direction, never backwards, so it's better to work from start to end.
Measures (Beats, Time/Key Signature, Tempo)
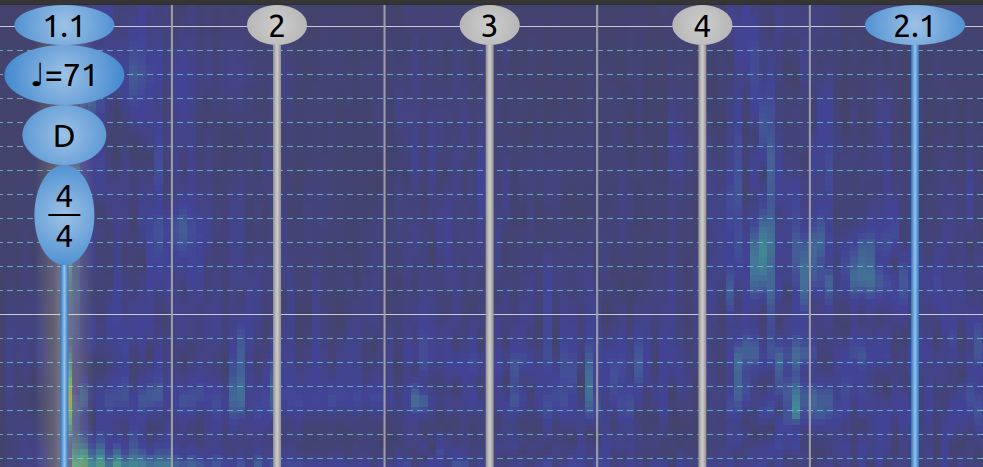
Click the measure tab  or press "2" on your keyboard to switch to measure editing mode. AnthemScore needs to know where the beats and downbeats are located in order to create sheet music. In the main spectrogram window, downbeats are blue lines and non-down beats are thick gray lines with beat numbers at the top. The thin gray lines between beats show the smallest note spacing. You can change the smallest allowed note in the side panel (spectrogram controls box). Settings like the time/key signature and tempo can be applied only to downbeats, the start of a measure. They apply from that point forward until a new value is set, so it's easy to define key/time changes, but if your song only has one key or time signature, you can simply set it once at the very first downbeat. Moving beats:
- Left click and drag any beat to move it around. Moving a downbeat will proportionally shrink/expand the non-down beats in between.
- Ctrl + left click and drag a beat to shift that beat and all beats after it.
Side panel measure tools:
- Measure number: The measure number spinbox in the side panel allows you to re-number measures in the sheet music
- Time signature top: The number of beats per measure
- Time signature bottom: The type of note that gets one beat. Changing the bottom number in the time signature only changes the sheet music annotation. It does not alter the number of measures. So to convert 3/4 to 6/8, for example, you also need to halve the number of measures.
- Key: The key signature
- Tempo: The annotated tempo in sheet music. The empirically calculated value is shown next to it in parenthesis.
- Set beats to constant tempo : Adjust the timing of all beats from the selected beat onwards to a fixed tempo.
- +: Insert one measure after the selected downbeat
- -: Remove the current measure
- ×2: Double each measure from this point onwards
- ×½: Remove every other measure from this point onwards, including any annotations like time/key signature changes.
- >: Shift every beat right by one.
- <: Shift every beat left by one.
- Tapping downbeats: Select a downbeat and click "Start" and then "|". This will start audio playback from the selected beat
onwards and you can press Enter or click "|" as each downbeat plays. You can wait for the audio to finish playing or press the
 button to end early. To cancel, press the
  .
You can slow down the playback if needed with the playback speed slider.
.
You can slow down the playback if needed with the playback speed slider.
Percussion
Click the tab with a drum or press '3' on your keyboard to switch to percussion editing mode. Percussion is displayed at the very bottom of the note grid. Similar to editing notes, left click to add or remove a percussion note. Unlike notes, percussion always takes up only one grid space. The duration (eighth, quarter, etc.) in sheet music is based on the spacing between notes. You can right click to select a region and copy and paste a group of percussion notes, press the delete key to remove them, or set their volume in the side panel.
Lyrics, Chords, and Dynamics
AnthemScore doesn't currently detect lyrics or chords or apply dynamic markings, but you can add these manually by exporting a .musicXML file and editing the sheet music in any 3rd party music notation software like MuseScore (free), Finale, Sibelius, or LilyPond. This is also the way to make any other advanced changes, like adjusting note stems.
Viewing Sheet Music
AnthemScore has a built-in viewer for sheet music. However, if you have a music notation program like Sibelius, Finale, MuseScore, LilyPond, etc. you can link this program in AnthemScore () and the external program will be used instead to view sheet music. To use an external editor, select the "use external program" radio button and provide the path to the application (.exe on Windows). The sheet music button ![]() will save any edits you have made to the notes and open the sheet music with the default save settings. Sheet music is saved as a musicXML file in the default save folder listed in preferences, unless you specify a different path when opening the audio. You can save the sheet music with custom settings by clicking . MusicXML is a common sheet music format supported by all major music notation programs.
will save any edits you have made to the notes and open the sheet music with the default save settings. Sheet music is saved as a musicXML file in the default save folder listed in preferences, unless you specify a different path when opening the audio. You can save the sheet music with custom settings by clicking . MusicXML is a common sheet music format supported by all major music notation programs.
Save & Export
or ![]() will save an AnthemScore project (.ASDT file). To export to any other file format choose or
will save an AnthemScore project (.ASDT file). To export to any other file format choose or ![]() .
.
Save As
Save an AnthemScore project file.
- Filename: The full path to save the project to. Click Browse, choose a folder, type the name of your project, and click Save/Ok.
- Format: This will always be ASDT.
ASDT Options
- Compact: A compact file does not save the Spectrogram data, so the file size is smaller, but it will be slower to open, since the spectrogram must be recalculated.
- Mono audio: Choosing mono audio may also decrease file size.
Export

Format
- MusicXML Sheet Music: MusicXML is a sheet music file format that can be opened in almost all 3rd party music notation programs (MuseScore, Finale, etc.)
- PDF: A PDF document of the sheet music
- MIDI: A midi file, which also uses the defined instrument parts
- Spectrogram Amplitudes: A simple text file containing raw spectrogram data. The 1st row in the file is a list of frequencies. The 2nd row is a list of time values. The 3rd row onwards give amplitudes with time across rows and frequency across columns.
- Beat and Note Timing: A simple csv file giving the timing of notes and beats
Instrument Parts and Note Groups
Sheet Music Options
MIDI Options
- Transpose: Any transposition to apply to the exported MIDI file
- Constant note volume (velocity): Overwrite all MIDI velocities to this constant value. If not checked, the volume for each note will be automatically detected from the audio.
Timing
This option controls the tempo information stored in the MIDI file, sometimes called the tempo map. It only changes the internal representation of the tempo and does not usually affect the actual timing of the notes when the MIDI file is played. If the tempo is very low there could be a noticeable effect to note timing due to rounding errors, but this is uncommon.
- Auto-detected tempo map: The tempo is auto-calculated based on the time between beat locations and thus changes every beat.
- User annotated tempos: Use tempos set in the blue downbeats.
- Constant tempo: The MIDI file will be written at a nominal constant tempo of 120 BPM.
Use musical (rounded) timing: This option controls the timing of the notes in the MIDI file. If checked, note onsets and offsets will be determined by musical time, the smallest allowed note grid position. If not checked, note onsets will follow the actual timing in the musical performance.
Languages
Select a language from the file menu by clicking File > ![]() Language. Translation files can be edited by users. The available languages are determined by the JSON text files stored in the 'languages' subfolder in the AnthemScore installation directory. If you fix any translation errors or create a new translation file and want to make the changes available to everyone, email the updated file to support@lunaverus.com. Note that any changes to these files will be lost when you update AnthemScore, so create a backup of those files before updating.
Language. Translation files can be edited by users. The available languages are determined by the JSON text files stored in the 'languages' subfolder in the AnthemScore installation directory. If you fix any translation errors or create a new translation file and want to make the changes available to everyone, email the updated file to support@lunaverus.com. Note that any changes to these files will be lost when you update AnthemScore, so create a backup of those files before updating.
Speed and Memory
By default, AnthemScore will use all available processor cores to speed up processing. You can reduce the number of worker threads spawned in . Using more threads also requires more memory, so keep an eye on memory usage by the program and decrease the number of threads if needed. Changing the number of threads will not affect any current or pending jobs, only files opened after the change. It's best to only have one instance of the program running at a time. Multiple instances of AnthemScore will slow each other down and will constantly overwrite the shared settings file.
Understanding the Display

A spectrogram of the song will be displayed in the main window. A spectrogram is a color plot of the energy at different frequencies over time. By default, the horizontal axis is time and the vertical axis is frequency (log scale), but this can be changed in the view menu. The color shows the amplitude. If the "note lines" box is checked, horizontal lines are drawn at the boundaries between the 88 piano keys. Ctrl + left click anywhere to play the note under the cursor.
What are Harmonics?

When a note is played on an instrument, the air vibrates at multiple frequencies, called the harmonics of the note. The pitch of the note is the frequency of its first harmonic. For example, when you play C4, or middle C, on the piano, the piano string vibrates at the frequency of C4 (261.63 Hz). But it also simultaneously vibrates at multiples of that frequency: 523.26 Hz (C5), 784.89 Hz (G5), 1046.52 Hz (C6), etc. You only hear a single pitch because your brain recognizes that the frequencies are multiples of 261.63 Hz and groups them together. Usually the 1st harmonic is the strongest and each successive harmonic is weaker, but it can vary. For example, the clarinet has strong odd harmonics (1, 3, 5, 7, ...) and weak even harmonics (2, 4, 6, 8, ...). The AnthemScore side panel has an option to show harmonic lines above the cursor. This can be helpful in determining whether a note exists where the cursor is. The relative amplitude of the different harmonics is partly what gives different instruments their characteristic sound, or timbre. Sometimes the 1st harmonic may be missing entirely and the only way to identify the note is to look at the spacing between harmonics. It's also possible, and quite common, for two notes to played together where one note falls on a harmonic of another note (for example C4 and C5, which are an octave apart). When this happens, the higher note's harmonics will be hidden by the lower note, unless they stand out from having stronger amplitudes or small differences in timing.